How Are Jewelry Boxes Produced? A Guide to Jewelry Packaging Manufacturing

Jewelry boxes are precision-crafted to protect jewelry, boost brand identity, and enhance unboxing experiences. Their production varies by material (paper, wood, leather) and use, but follows a standard workflow of pre-production, core manufacturing, post-production, and specialized steps.
1. Pre-Production: Lay the Foundation
This phase ensures alignment with design goals and avoids errors, covering three key steps:
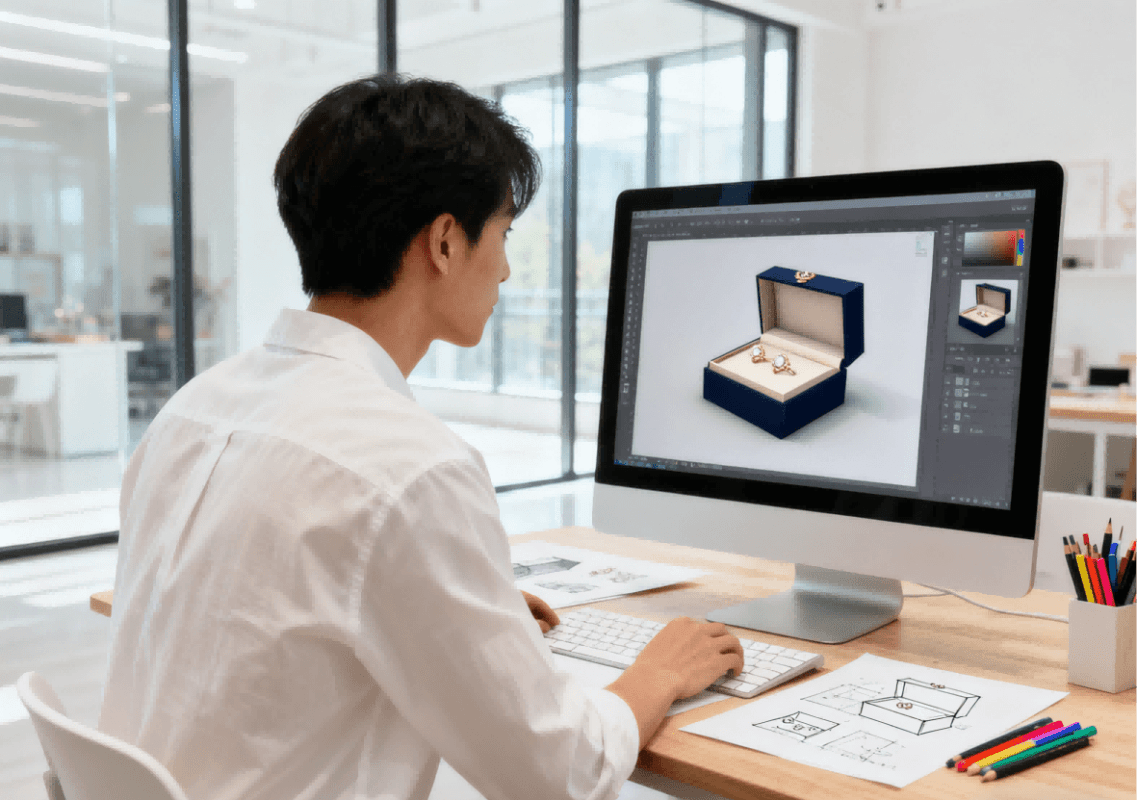
A. Design & Specifications
- Start with a brief defining purpose (e.g., ring storage), target audience (luxury/budget), and brand elements (logo, colors).
- Use software (Adobe Illustrator for 2D, SolidWorks for 3D) to finalize details: dimensions, structural features (hinges, closures), and aesthetics (foil stamping, embossing).
- For specialized boxes (light-up, anti-tarnish), add technical specs (LED placement, battery size).
B. Material Sourcing
- Paper/cardboard: Rigid paperboard (24pt–40pt), coated/laminated paper (water-resistant), and linings (felt, thin velvet); sustainable options include FSC-certified or recycled board.
- Wood: Softwoods (pine, cedar) for budget boxes, hardwoods (oak, walnut) for luxury; ensure FSC certification for legal, sustainable sourcing.
- Leather: Full-grain/top-grain/genuine leather (1–2mm thick) or vegan leather (PVC/PU); plus linings (anti-tarnish velvet, silk) and hardware (magnetic closures, brass hinges).
C. Prototype Testing
- Create physical prototypes (hand-assembled for simple boxes, small-scale tools for complex designs).
- Test for functionality (closure security, jewelry fit), aesthetics (color accuracy, logo placement), and durability (hinge strength, scratch resistance).
Revise designs (e.g., thicken paperboard from 24pt to 36pt if flimsy) based on feedback.
2. Core Production: Material-Specific Processes
A. Paper/Cardboard Boxes (Fast, Cost-Effective)
- Cutting: Use a die-cutting machine to create flat “blanks” from paperboard; print designs first (digital for small batches, offset for large runs).
- Scoring: Add creases for easy folding (e.g., lid/base creases for flip-top boxes).
- Lining: Glue linings (felt/velvet) to blanks via automated dispensers (hand-applied for luxury, no visible seams).
- Assembly: Fold blanks, glue/tape seams, and insert hardware (magnetic closures).
- Decorating: Add foil stamping, embossing, or ribbons.
B. Wooden Boxes (Luxury, Heirloom-Quality)
- Lumber Prep: Cut wood into planks (6mm for sides, 10mm for base) with a table saw; sand with a belt sander.
- Component Cutting: Use a CNC router for precise parts (sides, lid, dividers) and decorative engravings.
- Joinery: Assemble with dovetail joints (luxury, hand-cut) or glued joints (budget, clamped 2–4 hours to dry).
- Finishing: Sand with 400–600 grit paper, apply stain (if needed), then a clear coat (varnish/lacquer/wax).
- Lining & Hardware: Glue anti-tarnish linings; attach brass hinges and magnetic closures.
C. Leather Boxes (High-End, e.g., Cartier/Tiffany)
- Cutting: Use a clicker press (metal die) to cut leather pieces (vegan leather uses die-cutting machines).
- Edge Finishing: Sand edges, treat with paint/wax to prevent fraying.
- Base Prep: Create a rigid base (cardboard/wood), wrap in leather, and glue excess material at seams.
- Assembly: Attach brass hinges to lid/base (fold leather around hardware for a seamless look); insert magnetic closures.
- Final Touches: Hand-sand excess glue, add embossed logos via heat press (120–140°C to avoid damage), and glue silk/velvet linings (hand-stitched for luxury).

3. Post-Production: QC, Packaging, Distribution
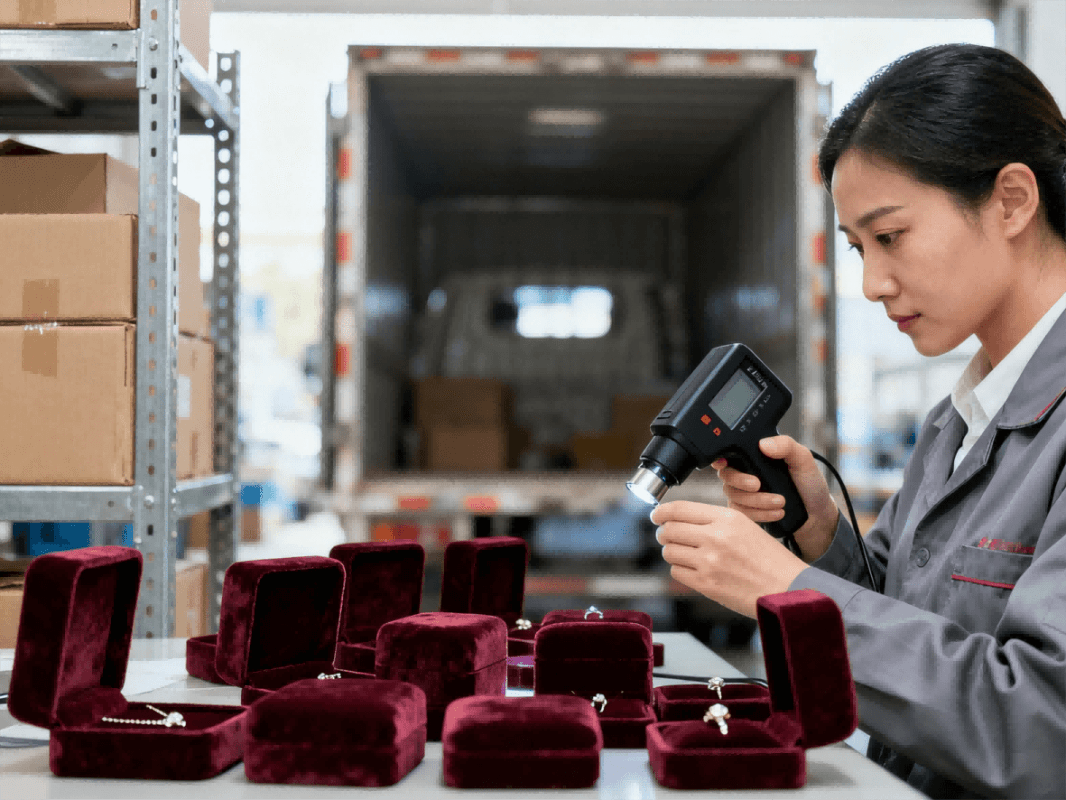
A. Quality Control (QC)
- Sampling: Inspect 5–10% of batches (20% for luxury) via a checklist:
- Dimensions match specs; no scratches/color inconsistencies; closures work; LEDs function (light-up boxes).
- Defect Resolution: Rework (reglue linings) or discard defective boxes; pause production if >2% are flawed.
B. Shipping Packaging
- Individual Protection: Wrap luxury boxes in tissue/dust bags; remove batteries from light-up boxes.
- Bulk Packing: Place boxes in corrugated cartons with foam/bubble wrap; stack on pallets for large batches.
- Labeling: Add product details (e.g., “Leather Ring Box – 50 Units”), destination, and “Fragile”/“Keep Dry” instructions.
C. Distribution
- B2B: Ship to brands/retailers via freight (3–10 days domestic, 2–4 weeks international).
- B2C: Send custom boxes (e.g., personalized engagement boxes) via express carriers with tracking.
4. Specialized Production
- Light-Up Boxes: Insert LEDs into pre-cut grooves, add a battery compartment/switch, hide wiring under linings, and test illumination/battery life (50+ hours).
- Anti-Tarnish Boxes: Treat linings with anti-tarnish chemicals; add sulfur-absorbing tabs.
- Custom Boxes: Handcraft (e.g., hand-painted wood, hand-carved designs) with multiple QC checks.
Conclusion
Jewelry box production blends art and engineering, tailored to material and brand goals. For brands, understanding this process helps select manufacturers; for consumers, it highlights craftsmanship. If you are looking for jewelry gift packaging that suits your own brand, please click on our website to view it, or you can click here to contact our professional service team directly